前一篇「ASP.NET MVC 使用 jQuery EasyUI DataGrid 基礎篇」說明了在 ASP.NET MVC 使用 jQuery EasyUI DataGrid 最基礎的操作方式,而這一篇則要來說明如何啟用分頁功能。
因為 Northwind 的 Category 資料數比較少,所以這一次改用 Customer 來做示範,先做好一個基本的 DataGrid 以及 Controller, View,
CustomerController
將取得 Customer 全部資料與全部資料數的程式移到 CustomerService 類別裡,
CustomerService
~/Views/Customer/Index.cshtml
@{ ViewBag.Title = "Index";}
@section styles
{<link href="~/Content/easyui/themes/default/easyui.css" rel="stylesheet" />
}
<div class="page-header">
<h2>jQuery EasyUI DataGrid - Customer</h2>
</div>
<table id="DataGrid"></table>@section scripts
{ <script src="~/Content/easyui/jquery.easyui.min.js"></script> <script type="text/javascript"> $(function () { var getGridJSON = '@Url.Action("GetGridJSON", "Customer")';Initialize_DataGrid(getGridJSON);
});
function Initialize_DataGrid(getGridJSON) { $('#DataGrid').datagrid({ title: 'Northwind - Customer',url: getGridJSON,
width: '800', height: '400', rownumbers: true,columns: [[
{ field: 'CustomerID', title: 'ID' }, { field: 'CompanyName', title: 'CompanyName' }, { field: 'ContactName', title: 'ContactName' }, { field: 'ContactTitle', title: 'ContactTitle' }, { field: 'Address', title: 'Address' }, { field: 'City', title: 'City' }, { field: 'Region', title: 'Region' }, { field: 'Country', title: 'Country' }, { field: 'Phone', title: 'Phone' }, { field: 'Fax', title: 'Fax' }]]
});
}
</script>
}
顯示結果:
全部的 Customer 資料數有 91 筆,所以全部讀取並且顯示到網頁上就會耗費很多時間,
而且一次顯示 91 筆資料也不容易閱讀,所以我們可以加入分頁功能,讓每次只有顯示部分的資料,也不必每次都向資料取出所有的資料。
jQuery EasyUI DataGrid 本身雖然沒有直接提供分頁功能,但是可以結合 jQuery EasyUI 的 Pagnation 來達到分頁顯示資料的需求。
Step.1
先加入 Customer Index.cshtml 頁面上 DataGrid 的分頁設定,要設定「pagenation, pagePosition, pageSize」,
pagination, 設定是否啟用分頁功能,true or false
pagePosition, 分頁列顯示位置,可以設定 top, bottom or both
pageSize, 設定 DataGrid 每個分頁的顯示資料數
Step.2
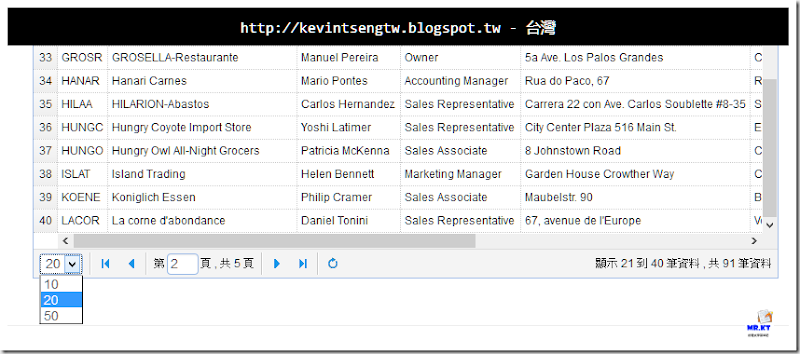
接著設定與增加 jQuery EasyUI Pagination,
pageSize, 預設每個分頁的預設資料數
pageList, 可以變更每個分頁所顯示的資料數,如無設定則會使用預設的 [10,20,30,50]
showPageList, 是否顯示 pageList, 如果不想讓使用者變更分頁的顯示資料數,則可以設定為 false
beforePageText, afterPageText, displayMsg, 設定分頁列顯示的文字內容
Step.3
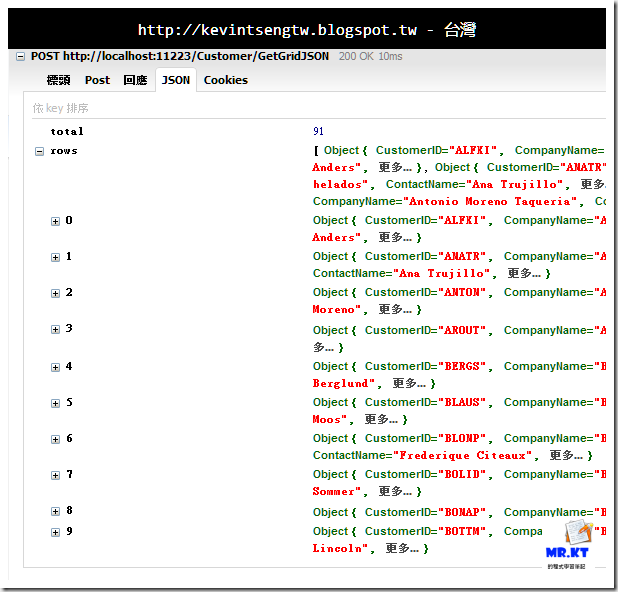
設定為前端的部分,接下來就是要修改 Controller 的部分,Controller 的 GetGridJSON 方法要增加兩個變數:page, rows,page 為分頁的頁數,而 rows 為分頁所顯示的資料數,
CustomerController
CustomerService
而在 CustomerService 的 GetJsonForGrid 方法也增加兩個變數,並且在程式的 Linq Expression 使用 Skip Take 來取得分頁的資料,
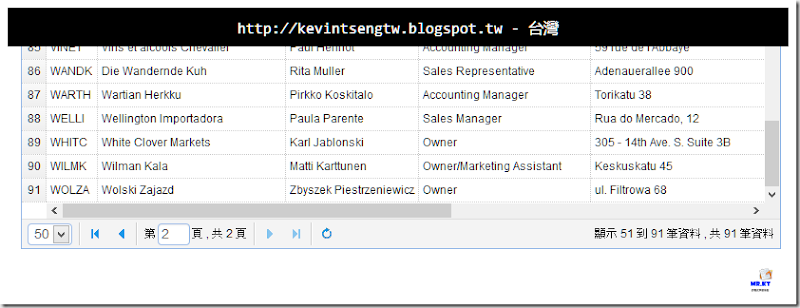
執行結果:
如果想要對 jQuery EasyUI 的 Pagination 或 DataGrid 與 Pagination 多瞭解一些,直接到 jQuery EasyUI 的官網看說明文件與 Demo 和 Tutorial 內容,下次說明排序的功能操作。
jQuery EasyUI
首頁 http://www.jeasyui.com/index.php
Demo http://www.jeasyui.com/demo/main/index.php
Tutorial http://www.jeasyui.com/tutorial/index.php
Documentation http://www.jeasyui.com/documentation/index.php
以上


沒有留言:
張貼留言